What is Web Voice?
Web Voice (Voice Call in Chat) is a feature that adds real-time voice conversation capabilities to your chat widget. Instead of typing messages, users can:- Click a phone icon to start a voice conversation
- Speak naturally to the AI agent using their device’s microphone
- Hear responses from the AI agent in a natural voice
- Switch seamlessly between text and voice in the same conversation
- Use on any device - desktop, tablet, or mobile browser
Web Voice uses your selected workflow configuration, so all agent behavior, prompts, voice settings, and tools are inherited from the workflow you choose.
Prerequisites
Before enabling Web Voice, ensure you have:- An active Botcadence account
- An organization and project set up
- A chat agent created and configured
- A workflow configured with voice settings (prompt, voice model, tools)
- Permission to update the chat agent settings
How Web Voice Works
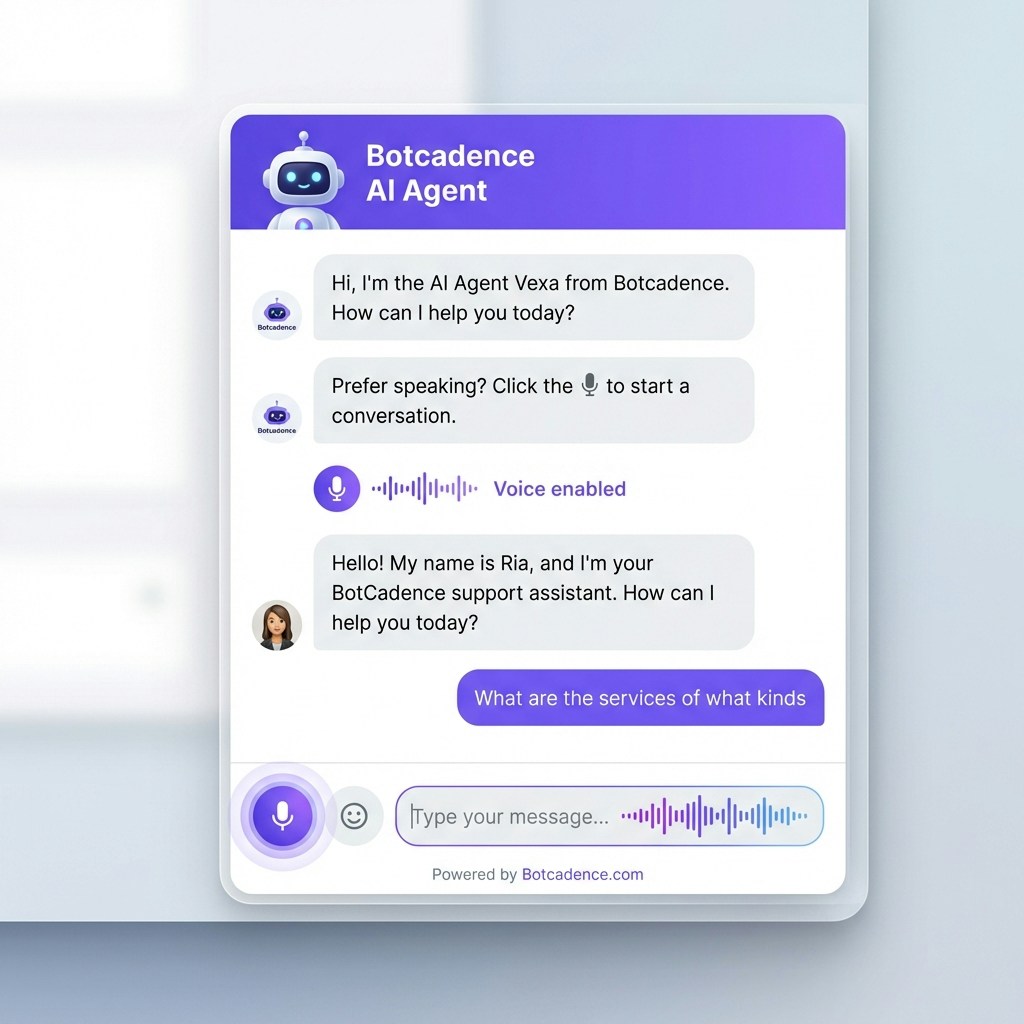
When a user visits your website with Web Voice enabled:User sees the phone icon
The chat widget displays a phone icon alongside the text input, indicating that voice conversations are available.
User initiates voice call
When the user clicks the phone icon, the browser requests microphone permission (if not already granted). Once granted, the voice call begins.
Voice conversation starts
The AI agent greets the user with a voice message. The user can now speak naturally, and the AI responds with voice, just like a phone call.
Real-time conversation
The conversation flows naturally with:
- Speech-to-text conversion of user’s voice
- AI processing and response generation
- Text-to-speech conversion of AI responses
- Visual indicators showing when the AI is listening or speaking
Enable Web Voice
Follow these steps to enable Web Voice in your chat agent:Navigate to Chat Agent settings
After logging in, go to your project dashboard. In the sidebar, find and click on Chat Agent. This will open the chat agent configuration page.
Open the Web Voice tab
At the top of the chat agent settings page, you’ll see several tabs: General, Chat & Lead Capture, AI Configuration, Web Voice, Appearance, Human Handover, and Notifications. Click on the Web Voice tab.
Enable Web Voice
You’ll see a toggle switch labeled Enable Web Voice with the description “Enable voice call functionality in the chatbot widget. Users will see a phone icon to start voice conversations with the AI agent.”Toggle this switch to the ON position (it will turn blue/purple when enabled).
Select a workflow
Below the enable toggle, you’ll see a Workflow dropdown field marked with an asterisk (*) indicating it’s required.Click the dropdown and select the workflow that defines your agent’s behavior for voice calls. For example, you might see “Botcadence customer support Workflow” or other workflows you’ve created.
The workflow you select determines:
- The AI agent’s prompt and personality
- The voice model and voice settings
- Available tools and actions
- All other voice call configurations
Configure call features (optional)
Under the Call Features section, you can configure additional settings:Enable Call Recording:
- Toggle this ON to record audio of all calls for this campaign
- Recordings can be reviewed later for quality assurance and training
- Set the number of seconds of silence before the agent re-prompts the user
- Default is typically 8 seconds
- Range: 1-60 seconds
- Lower values make the agent more responsive but may interrupt users
- Higher values give users more time to think but may feel less responsive
Save your changes
After enabling Web Voice and configuring your settings, scroll to the bottom of the page and click the Save Changes button. You’ll see a confirmation message when the settings are successfully saved.
Web Voice is now enabled! Users visiting your website will see a phone icon in the chat widget and can start voice conversations.
User Experience
Starting a Voice Conversation
When users visit your website with Web Voice enabled:- Chat widget appears with the standard chat interface
- Phone icon is visible in the message input area or as a separate button
- User clicks the phone icon to initiate a voice call
- Browser requests microphone permission (first time only)
- Voice call begins with a greeting from the AI agent
- Visual indicator shows “Voice enabled” status
During the Voice Call
While in a voice conversation:- Audio waveform animation shows when the AI is speaking
- Microphone icon indicates when the system is listening
- Text transcription of the conversation appears in the chat window
- Stop button allows users to end the voice call at any time
- Seamless experience with minimal latency
Ending the Voice Call
Users can end the voice call by:- Clicking the stop/end call button
- Closing the chat widget
- Switching back to text mode
Configuration Best Practices
Workflow Selection
Choose a workflow that:- Has clear, conversational voice prompts
- Uses appropriate voice settings for your use case
- Includes necessary tools (knowledge base search, booking, etc.)
- Matches your brand voice and tone
Call Recording
Enable recording if you need to:- Monitor quality and accuracy of AI responses
- Train and improve your AI agent
- Comply with quality assurance requirements
- Review complex or escalated conversations
- You’re handling sensitive information and want to minimize data storage
- Your users prefer not to be recorded
- You don’t need conversation review capabilities
Silence Threshold
Lower threshold (3-6 seconds):- More responsive and engaging
- Better for quick Q&A scenarios
- May interrupt users who are thinking
- Good for simple support queries
- Balanced approach for most use cases
- Gives users time to formulate questions
- Prevents awkward silences
- Recommended for general customer support
- Best for complex conversations
- Allows users to think and respond thoughtfully
- May feel less responsive
- Good for consultative or sales conversations
Troubleshooting
Phone icon not appearing in chat widget
Phone icon not appearing in chat widget
Possible causes and solutions:
- Web Voice not enabled: Verify that the “Enable Web Voice” toggle is ON in the Chat Agent settings
- No workflow selected: Make sure you’ve selected a workflow in the Web Voice configuration
- Changes not saved: Ensure you clicked “Save Changes” after enabling Web Voice
- Cache issue: Clear your browser cache and refresh the page
- Widget not updated: If using an embedded widget, make sure you’re using the latest embed code
Microphone permission denied
Microphone permission denied
What to do:
- Browser blocked microphone: Check browser settings to allow microphone access for your website
- System permissions: On some devices, you may need to grant microphone access at the OS level
- HTTPS required: Web Voice requires a secure HTTPS connection - it won’t work on HTTP sites
- Browser compatibility: Ensure you’re using a modern browser that supports Web Audio API
Web Voice works best on Chrome, Firefox, Safari, and Edge. Some older browsers may not support all features.
Voice call not starting
Voice call not starting
What to check:
- Verify microphone permissions are granted
- Check that your workflow is properly configured with voice settings
- Ensure your internet connection is stable
- Try refreshing the page and starting again
- Check browser console for any error messages
- Verify that the workflow has a valid voice model selected
AI not responding to voice input
AI not responding to voice input
Troubleshooting steps:
- Speak clearly: Ensure you’re speaking clearly and at a normal volume
- Check microphone: Test your microphone in other applications
- Silence threshold: The AI may be waiting for the silence threshold - try pausing after speaking
- Background noise: Reduce background noise that might interfere with speech recognition
- Workflow configuration: Verify your workflow has proper voice settings configured
Poor audio quality or lag
Poor audio quality or lag
How to improve:
- Check internet connection: Ensure you have a stable, fast internet connection
- Close other tabs: Reduce browser load by closing unnecessary tabs
- Update browser: Use the latest version of your browser
- Reduce background apps: Close other applications using your microphone or network
- Try different device: Test on a different device to isolate the issue
Can't save Web Voice settings
Can't save Web Voice settings
What to check:
- Verify you have permission to update the chat agent
- Ensure a workflow is selected (required field)
- Check your internet connection
- Look for any error messages on the page
- Try refreshing the page and configuring again
- Verify all required fields are filled
Technical Requirements
Browser Support
Web Voice works on modern browsers that support:- Web Audio API
- WebRTC
- MediaStream API
- Speech Recognition (optional, for enhanced features)
- Chrome 60+
- Firefox 55+
- Safari 11+
- Edge 79+
Network Requirements
For optimal performance:- Minimum bandwidth: 256 kbps upload/download
- Recommended bandwidth: 512 kbps or higher
- Connection type: Stable broadband or 4G/5G mobile
- Latency: Lower is better (under 200ms recommended)
Security Requirements
- HTTPS required: Web Voice only works on secure HTTPS websites
- Microphone permissions: Users must grant microphone access
- Privacy compliance: Ensure compliance with GDPR, CCPA, and other privacy regulations
Use Cases
Customer Support
Enable customers to:- Ask questions verbally instead of typing
- Get instant voice responses to common queries
- Navigate complex issues with voice guidance
- Access support hands-free while multitasking
Sales and Lead Qualification
Use voice to:- Engage visitors with a more personal touch
- Qualify leads through natural conversation
- Schedule demos and appointments via voice
- Provide product information conversationally
Accessibility
Web Voice improves accessibility for:- Users with mobility impairments who find typing difficult
- Visually impaired users who prefer voice interaction
- Users on mobile devices where typing is cumbersome
- Multilingual users who speak better than they type
E-commerce
Enhance shopping with:- Voice-based product search and recommendations
- Hands-free browsing while cooking, cleaning, etc.
- Quick order status checks via voice
- Voice-guided checkout assistance
Privacy and Compliance
Data Handling
When Web Voice is enabled:- Voice input is converted to text for processing
- Conversation data is stored according to your data retention settings
- If call recording is enabled, audio files are stored securely
- All data is encrypted in transit and at rest
User Consent
Best practices for compliance:- Inform users that voice conversations are with an AI agent
- Disclose if calls are being recorded
- Provide a privacy policy link in your chat widget
- Allow users to opt-out of voice features
- Comply with local regulations (GDPR, CCPA, etc.)
Recording Notifications
If you enable call recording:- Add a notification in your chat widget
- Include recording disclosure in your privacy policy
- Consider adding a verbal notification at the start of calls
- Provide users with access to their recorded conversations (if required)
Tips for Success
Optimize Your Workflow
- Clear prompts: Use conversational, natural language in your workflow prompts
- Voice-friendly responses: Keep AI responses concise and easy to understand when spoken
- Test thoroughly: Test voice conversations extensively before going live
- Handle interruptions: Configure your workflow to handle user interruptions gracefully
Enhance User Experience
- Provide guidance: Add a tooltip or help text explaining how to use voice features
- Visual feedback: Ensure clear visual indicators for listening, speaking, and processing states
- Fallback options: Always provide text chat as an alternative
- Mobile optimization: Test thoroughly on mobile devices where voice is especially useful
Monitor and Improve
- Review recordings: If enabled, review call recordings to identify improvement areas
- Track metrics: Monitor voice call usage, duration, and success rates
- Gather feedback: Ask users about their voice experience
- Iterate workflow: Continuously refine your workflow based on real conversations
Performance Optimization
- Optimize silence threshold: Adjust based on actual user behavior patterns
- Balance quality and speed: Choose voice models that balance quality with response time
- Minimize latency: Ensure your workflow is optimized for quick responses
- Test under load: Verify performance during peak usage times
Summary
Web Voice (Voice Call in Chat) enables:- Voice conversations directly in your chat widget
- Easy activation via a phone icon in the chat interface
- Workflow-based configuration inheriting all voice settings
- Customizable call features including recording and silence detection
- Seamless user experience with visual feedback and easy switching
Quick Reference
Key Features:- One-click voice activation from chat widget
- Real-time voice-to-text and text-to-voice conversion
- Workflow-based configuration
- Optional call recording
- Adjustable silence threshold
- Visual conversation indicators
- Navigate to Chat Agent → Web Voice tab
- Enable Web Voice toggle
- Select a workflow
- Configure call features (optional)
- Save changes
- HTTPS website
- Modern browser with microphone support
- Configured workflow with voice settings
- User microphone permission